
 Deutsch
When I moved from Germany to England, I had no idea how much the change would spark my love for interior design. Living here, I’ve been so inspired by the lovely English interiors, and I’ve found myself drawn to things like panelling, wainscoting, and picture rails. I’ve even started to play with colours and think about giving wallpaper a go, all while keeping true to my personal style, which is a mix of neutral tones and a hint of boho.
This inspiration actually led me to tackle a project that’s been on my mind since we moved in – our kitchen extension. The area that leads straight out to our garden had turned into a bit of a dumping ground for muddy wellies, jackets, and tools, taking over the cute little coffee corner we had planned. With only about 90cm of wall to work with, I knew I had to get creative to turn this tiny space into a mini mudroom that actually works and looks good too.
In this blog post, I’m chuffed to take you through the process of how we transformed this challenging spot into a practical and pretty corner. I’ll share all the steps, what we used, and of course, plenty of before and after snaps so you can see the amazing transformation for yourself. Let’s dive in!
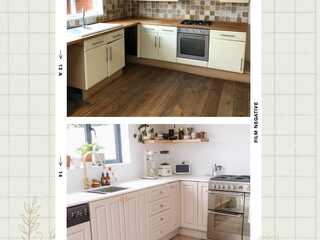
Before we dive in, let me show you a before snap of the area before we moved in:

Originally, we hadn’t planned on renovating everything – we just wanted to open up the wall between the dining room and kitchen. But when we started, the builders realised that there wasn’t enough support for some openings in the kitchen, so we had to add more steel. They also discovered that one wall wasn’t properly insulated, which meant we had to redo the entire brickwork on one side. When all that was finally sorted, we were left with an amazing blank canvas to work with.


First, we added a vintage wooden cupboard with rattan details, which was brilliant for storing lots of our kitchen bits and bobs. We also created a little coffee corner on the unused wall to the right. Our idea was to sit there regularly, sip on a cuppa, and get some work done.


And we did use that corner often to work and relax, but not as much as we would have liked. Because after a while, it turned into a proper dumping ground for wellies, bags, tools, and whatnot.
That’s what led me to this brilliant idea (if I do say so myself, haha!): creating a mini mudroom wall or corner. We only had 90cm of space to play with, but I was determined to maximise that space and make it super practical and easy on the eye too.
What we used:
- Spruce Tongue & groove Cladding (L)2.4m (W)95mm (T)7.5mm
- gorilla glue
- a nail gun
- a mitre saw to cut the angles in the panels (due to our roof)
- paint from F&B but colour matched (sulking room pink) in eggshell so it’s easily wipeable
- Natural Pine Quadrant Moulding as an end piece
- paint supplies of course
We also added:
- a vintage inspired wire metal basket with hooks (because that was exactly what I had in my vision)
- a welly rack for muddy shoes
- a shoe tray for wet shoes or other wet items
Here are some of the items to shop if you would like to do a similar project:

If you only need straight cuts, you could always ask the lovely folks at the hardware store to cut the pieces for you for a small fee. That way, you don’t have to faff about with the saw at home. We attached the panels with a nail gun and the moulding end piece with a bit of glue. Then, we gave everything a coat of wood primer and followed it up with our colour of choice: Sulking Room Pink by Farrow & Ball, but colour matched to save a few quid. We added the metal wire basket with hooks and painted and attached the peg board for the wellies, and voila! The project was done and dusted. Pretty simple and straightforward, but it made SUCH a massive difference for us.


Now, the corner is not only useful and practical but also dead gorgeous, and I finally managed to incorporate a new colour into our home! It took a few paint samples since I was SO unsure about which colour to go for, but we finally settled on “Sulking Room Pink.” It’s a soft, slightly darker purple shade, so if the panels get a bit mucky, it’s not immediately noticeable. But it’s still light enough to fit in beautifully with the rest of my colour scheme of bright, beige, and neutral tones!


So, there you have it, folks – our mini mudroom makeover! It just goes to show that even the smallest, most overlooked spaces in your home can be transformed into something both practical and stylish with a bit of creativity and elbow grease.
I’d love to hear what you think of our little project! Have you ever tackled a similar makeover in your own home? Or maybe this has inspired you to have a go at creating your own mini mudroom? If so, I’d be chuffed to bits to see your projects – feel free to share them with me on social media or in the comments below.
And if you’re not quite ready to take on a full-blown makeover, that’s okay too! Even small changes like adding a few hooks or a pretty basket can make a big difference in keeping your space organised and looking fab.
Thanks for joining me on this little home improvement adventure. Until next time, happy DIY-ing!


2 comments
Wie schön!
danke dir!